Level Set Editor
An ordered list of screens, like levels or menu pages, that level select buttons, page dots and Flow View all read.
About 4 minutes
A Level Set is an ordered list of screens: level 1, level 2, level 3, or the pages of a swipeable menu. It doesn't hold the screens themselves, it just points at them in order, like a playlist. Several features read that list, so you set up the order once and they all follow it.
Level Sets are a game feature.
What a Level Set is used for
- A level select screen: a Layout set to fill from ▸ a Level Set makes one button per level. Each button shows the level's name and goes to its screen when tapped.
- Swipeable pages: a Page Indicator shows one dot per page in the set, and lets the player swipe between those screens.
- A tidy Flow View: Flow View shows the whole set as one node instead of a node for every level.
Making a Level Set
- In the Project panel, right-click and choose New data ▸ Level set.
- Or in Flow View, drag a level screen onto an existing set's node to add it to that set.
Double-click the asset to open the editor.
The editor
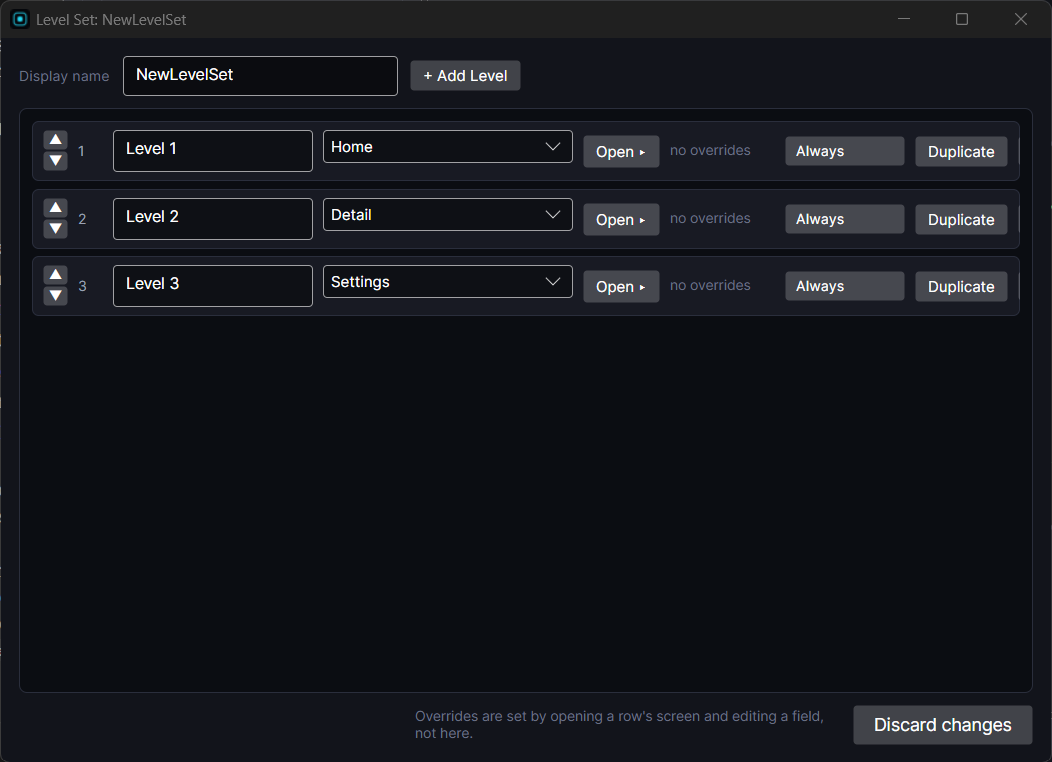
At the top, Display name is the set's own label, separate from its file name. + Add Level adds a row at the end.
Each row is one level, in play order:
- ▲ / ▼ move the row up or down. The number beside them is its place in the order.
- Name is what level buttons show, like "Forest 2". Left blank, the button keeps its template's own text.
- The screen picker chooses which screen this level plays. A ⚠ no screen means it hasn't been picked yet. ⚠ missing screen means the screen was renamed or deleted. The row keeps the old name so you can see what it was, until you pick the new one.
- Open ▸ opens that screen in the editor, with this window still open, so you can step through your levels one by one.
- Show when (for Page Indicator pages): the page only counts as a dot, and can only be swiped to, while a check is true. Use it to hide pages until they're unlocked, or to show fewer pages during a tutorial. Always shows it all the time.
- Duplicate copies the row, for a variation of a level.
- ✕ deletes the row. It never deletes the screen.
A line at the top of the editor tells you whether the set is pointing at screens yet.
Closing the window saves. Discard changes closes without saving what you changed since you opened it.
Building a level select
- Make your level screens and a Level Set listing them in order.
- On your level select screen, add a Group with a Layout (or Grid Layout for a grid of buttons). Usually it sits inside a Scroll.
- In the Layout's fill section, set fill from to a Level Set and pick your set.
- Build one button inside it as the template: a Shape with a Text on it, for example. It's copied once per level. Its Text shows the level's name, and tapping it goes to the level.
To lock levels or show stars, give the button a List Entry with show only when rows, or use only if checks on its actions.
Good to know
- Reordering the rows reorders everything that reads the set: buttons, dots and swiping.
- The older Level Select component does the same job as a Layout filled from a Level Set. It's only kept for projects that already use it.