Tile Palette
Where you pick tiles, layers and tools to paint a Tilemap: palettes, the layer list, every tool, and the shortcuts.
About 6 minutes
The Tile Palette is where you paint levels from. It holds your tiles on a board, lists the tilemap layers on the screen, and has the paint tools. You only need it once a screen has a Tilemap.
Open it from a Tilemap's Open Tile Palette button, or View ▸ Panels ▸ Tile Palette. It opens as a tab next to the Inspector.
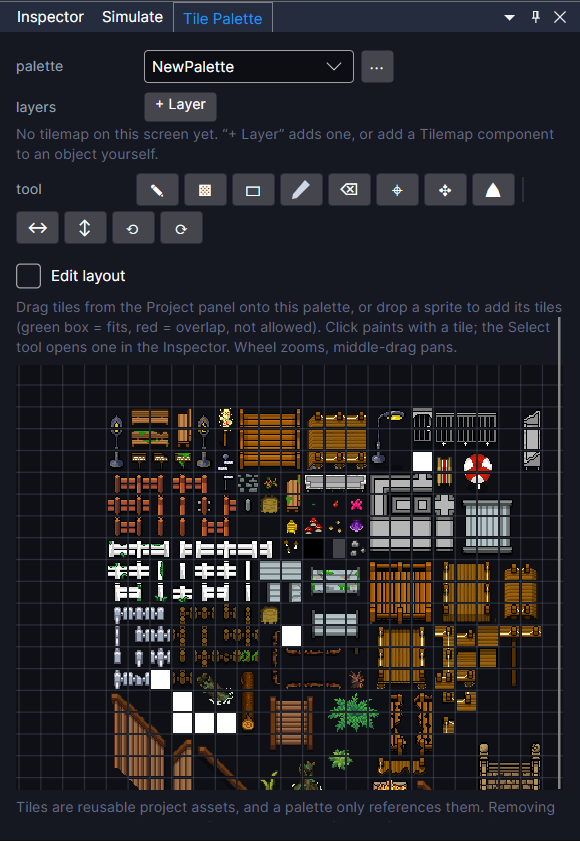
From top to bottom, the panel has the palette picker, the layers, the tools, the Edit layout switch, and the board. The top part stays put while the board scrolls.
Palettes
A palette is your own board of tiles, arranged however you like and saved as an asset in the Project panel. Most projects have a few: "Grass", "Dungeon", "Town".
- palette: which palette the board shows. Choose + New palette… to make one.
- ⋯: rename, duplicate or delete the palette shown.
A palette only points at tiles, it doesn't own them. The same tile can sit on several palettes, and removing a tile from a board (or deleting a whole palette) never deletes the tile itself.
A board holds three kinds of tile. A plain Tile is one picture. An animated Tile cycles through frames. An Auto-Tile picks the right edge or corner piece by itself as you paint, so a path or a cliff joins up on its own. All three paint the same way. See Tilemap for making them.
Layers
Real levels are built from a stack of tilemaps: ground, details, walls, roofs. The layers list shows every Tilemap on the screen, in draw order.
- Click a layer's name to paint into it. The highlighted one is where your painting goes.
- ◉ / ▨ hides or shows a layer while you work, so you can paint the ones under it. It's only for the Scene. A hidden layer still shows in Preview and on the watch.
- ▲ / ▼ moves a layer up or down. A layer higher in the list draws on top. Layers under different parents can't be swapped here; move them in the Hierarchy.
- ⤒ (isometric maps only): over units draws the layer on top of everything, for tree tops and roofs. Off, it sorts with the ground, so characters walk in front of and behind its tiles.
- + Layer adds another tilemap to the screen with the same grid and cell size as the current one, so they line up.
Tools
Click a tool to use it. Click it again to put it down, so a click in the Scene selects and moves objects instead of painting.
| Tool | What it does |
|---|---|
| ✎ Brush | Paints the chosen tile. Drag to paint a stroke. On a flat map you can paint past the edge and the map grows to fit. |
| ▩ Fill | Fills the connected area of matching tiles you click. |
| ▭ Box | Drag a rectangle to fill it with the chosen tile. It can also grow a flat map. |
| Eyedropper Pick | Click a painted cell to take its tile as your brush, then it switches back to Brush. |
| ⌫ Erase | Clears cells in the Scene. Use − and + to set the eraser size, from 1×1 up to 15×15. |
| ⌖ Select | Drag a box over tiles to select them. Click one tile to open it in the Inspector. |
| ✥ Move | Drag the selected tiles to a new spot. Dragging outside the selection starts a new one. Flat maps only. |
| ⛰ Height | Isometric maps only. Click or drag to set cells to the height shown, changed with − and +. A block is half a cell tall, so 0.5 is a half step. |
Flip and rotate
After the tools: ↔ flips the brush left to right, ↕ flips it top to bottom, and ⟲ / ⟳ rotate it 90°. The highlighted buttons show what the brush is set to. With a multi-tile brush, the whole block flips or turns together.
The board
Adding tiles
- Drag tiles from the Project panel onto the board.
- Drop a sliced sprite sheet to turn every slice into a tile in one go. While you drag, a green box means it fits there, and red means it would overlap other tiles.
Choosing what to paint
- Click a tile to make it your brush. If you were on a tool that doesn't paint, it switches to Brush.
- Drag a box over two or more tiles to paint with them as one block, laid out as they sit on the board. Gaps stay gaps, so painting the block never wipes what's under a hole. Auto-Tiles are left out of blocks.
Arranging the board
Leave Edit layout off while you paint, so a stray drag can't move or remove anything. Turn it on to arrange the board:
- Drag a tile to move it.
- Right-click a tile to remove it from the board.
- With Erase chosen, click or drag across tiles to remove them.
With Edit layout off, right-click a tile for Find in Project, which shows its asset in the Project panel.
Shortcuts
| Where | Do this | To |
|---|---|---|
| Scene | Ctrl + drag (painting tools) | Copy that area of the map as a multi-tile brush. |
| Scene | Shift + drag (Select, or the Ctrl copy) | Include every layer, not just the current one. |
| Scene | Delete | Clear the selected tiles (not the whole map). |
| Scene | Esc | Drop the tile selection. |
| Scene | Alt + click (Height tool) | Pick up that cell's height. |
| Board | Mouse wheel | Zoom in and out. |
| Board | Middle mouse drag | Move around the board. |
| Board | Right-click drag (Edit layout on) | Remove every tile you drag over. |
| Anywhere | Ctrl+Z / Ctrl+Y | Undo and redo painting. |