Your First Watch Face
Build a simple digital face from a blank page, get it ready for always-on, and put it on your wrist.
About 12 minutes
Every watch face, however fancy, is the same three things: something that shows the time, a background behind it, and a dimmer version for when the watch is resting. This tutorial builds exactly that once, a clean digital face with the date and a battery ring, so you see the whole loop before you learn any one piece of it in depth.
You don't need to know how to code, and you don't need a watch until the last step.
1. Create the project
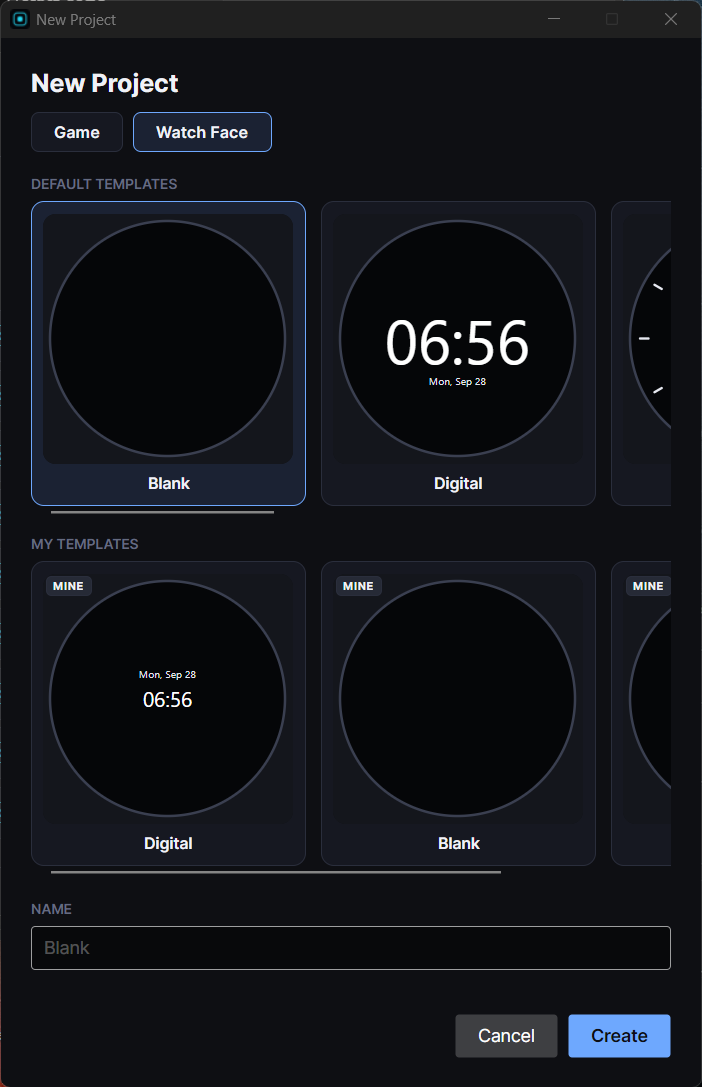
- Open WristForge Hub and click New project.
- Pick Watch Face (not Game).
- In the template gallery, choose Blank. The other templates (Analog, Digital, Fitness, Hybrid) are finished faces you can take apart later; Blank keeps this tutorial simple.
- Type a name and click Create.
The first time you open a watch face, a short guided tour starts. It covers the same ground as this page with the editor pointing at each button. You can replay it any time from Help, then Tours.
If you made a face in Samsung's Watch Face Studio, use Import .wfs in the Hub instead of New project. It comes in as a WristForge project you can keep editing.
2. Find your way around
- Hierarchy (left): every object on the face, one per row. Objects lower in the list draw on top.
- Scene (middle): the face as it will look on the watch. Click an object to select it, drag to move it.
- Inspector (right): everything you can change about whatever is selected.
3. Set the background
Click an empty part of the face. The Inspector shows the Background settings. Pick a solid colour, a two-colour gradient, or an image. Dark backgrounds look best on a watch and save battery.
Leave ambient at 0 for now. That hides the background when the watch dims, which is what most faces want.
4. Add the time
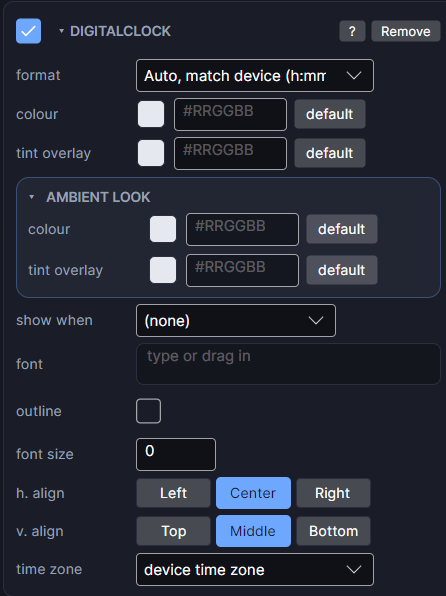
Click Add Object above the Hierarchy and choose Digital Clock. It appears in the middle of the face.
With it selected, look at the Inspector:
- format: leave it on Auto and the face follows the wearer's own 12 or 24 hour setting.
- colour and font size: make it big and easy to read. A watch is read in a glance.
5. Add the date and a battery ring
Two more objects from Add Object:
- Date Text. Drag it just under the clock. Pick a format you like in the Inspector, such as the weekday and day of the month.
- Battery Level. Choose a ring or arc style so it sits around the edge of the face, and give it a colour that stands out against your background.
That's a real, useful face already. Everything else you learn later (complications, colour choices for the wearer, animation) is more objects added the same way.
6. Design the ambient look
When a watch rests it switches to ambient mode: the screen dims and should show as little as possible. Google requires every face to have one, and a good one looks like a quieter version of the full face.
Click the moon button (Ambient) at the top of the Scene to see it. Each row in the Hierarchy has an ambient dot: filled means the object shows in ambient, a hollow ring means it's hidden.
For this face, keep the Digital Clock showing and hide the date and battery ring. New objects start hidden in ambient, except clocks, so this may already be done. Click the moon again to go back.
Google's rule of thumb is that no more than about 15 percent of the screen should be lit in ambient. Thin, light text on black is the classic look. See Ambient Mode for more.
7. Try it
Press F5 (or the Preview button). The time ticks, and the date and battery fill in with sample data.
Open the Simulate tab to test the awkward cases: set the time to 23
, drop the battery to 5 percent, or switch to ambient. Anything that overlaps or gets cut off at the round edge shows up here. See The Simulate Tab.Press F5 again to stop. Nothing you do while previewing changes your face.
8. Put it on your watch
- Open Build, then Build…. The first time, WristForge offers to download the Android build tools it needs. Say yes; it only happens once.
- Pair your watch from Build, then Devices…. You only do this once per watch.
- Back in Build…, pick Debug APK and build. It installs straight onto the watch.
- On the watch, long-press the current face and pick yours from the list.
If anything goes wrong, Getting Your Face Onto a Real Watch covers the details.
9. Share it
When you're happy with it, there are two ways to get your face onto other people's watches:
| Face Hub | Google Play | |
|---|---|---|
| Cost to you | Free | Google's developer account fee, plus WristForge Pro for the Play bundle |
| Setup | Upload one .zip on the WristForge site | Signing key, store listing, Google's review and testing rules |
| Price | Free, or a price in WristForge coins | Anything you set on Play |
Most people start with Face Hub: build a Face Hub build and upload it from your creator area on the site. For Google Play, see Publishing Your Face on Google Play.
Add live data like weather and steps with Complications, let the wearer pick their own colours with Color Styles and Flavors, or make the face change through the day with Time-of-Day Windows.